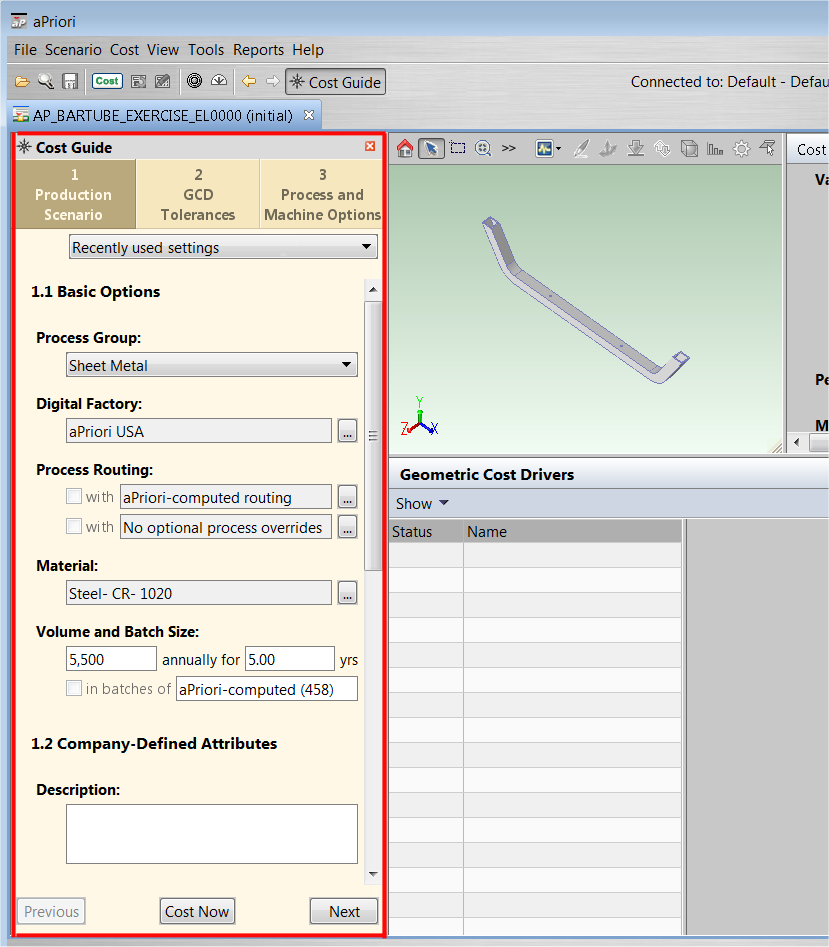
If you open a component that has not been costed, aPriori shows the Cost Guide at the left side of the desktop, for you to enter inputs needed to cost the component:
The Cost Guide gives quick access to key aP Pro features and tool, so that your initial costing can be more complete and more accurate.
Use the Cost Guide
The Cost Guide helps you both create initial inputs, and then refine those inputs as you refine your component analysis. You can do an initial cost with very few inputs. The Cost Guide makes it clear what cost factors you should consider, and makes it easy for you to specify those inputs that you decide to provide.
After you enter inputs, click the Cost Now button at the bottom of the Cost Guide (or the Cost button on the toolbar) to create an initial analysis.
Tip: Show or hide the Cost Guide by clicking the Cost Guide button in the toolbar, or by selecting the View > Show Cost Guideoption.
Cost Guide Inputs
-
Production Scenario tab:
-
Basic options such as Recently used settings, Process Group and Digital Factory. See Production Scenario: Tab Basic options.
-
Any User-Defined Attribute (UDAs) defined by your system administrator. See Production Scenario Tab: Attributes.
-
Target information, such as cost and mass. See Production Scenario Tab: Targets.
-
-
GCD Tolerances Tab: Tolerance policy and/or tolerances on individual GCDs (otherwise specified from the Manufacturing Process panel Edit > Tolerance menu, or from the context menu on individual GCDs in the Geometric Cost Drivers panel).
See GCD Tolerances tab. -
Process and Machine Options tab: Process setup options (otherwise specified from the Manufacturing Process panel Edit > Process Setup Options menu), and Machine Selection (otherwise specified from the Manufacturing Process panel Edit > Machine Selection menu).
See Process and Machine Options Tab.Note: you cannot access this Process and Machine Options tab until the component has been costed at least once.
View Input Details
To see the inputs you have provided to the Cost Guide, go to the Manufacturing Process panel in aP Pro and clicking Edit > Cost Overrides Summary. You can also reverse all your overrides from here by clicking the Clear All Overrides button at the bottom of the window. See Cost overrides summary dialog.
Costing activities at different stages
You can do different things with a component at different costing stages:
-
When you first open a component, aPriori retrieves visualization information, displays the part in the component viewer and displays the Cost Guide. At this point no GCDs have been extracted and no costing information has been processed. This stage is useful for quickly opening a CAD file and visually inspecting its contents. Since no information has been processed, you cannot save the part at this stage.
-
When you go to the GCD Tolerances tab, the GCDs are extracted. At this stage, even though you have not yet costed the component, you can save it along with its automatically generated thumbnail, which means that the component will be viewable in search results, although its cost information is shown as blank or “0”.
-
When the final stage is costed, the component appears in search results, and cost fields are populated with values based on the most recent cost operation.